Monthly Archives: June 2014

Peanut Chicken- Without a Wok!

Here I am again! Honestly, after my last recipe about the Oreo ball cookies, I’m not sure I need to continue blogging. Everyone just keeps asking me to make those cookies! But man cannot live on Oreo ball cookies alone- so here’s my peanut chicken recipe! Maybe I’m alone in this, but I am lacking a wok in my kitchen, so this recipe is for those who also lack one!

Here are the ingredients:

  • 1 tbsp vegetable oil or peanut oil
  • 1 pound boneless, skinless chicken breast, cut into bite sized pieces
  • 1 bag sugar snap peas
  • 1 red bell pepper
  • 1 can of sliced water chestnuts
  • 1 1/2 cups chicken broth (I used chicken bouillon cubes for convenience)
  • 2 tsp soy sauce
  • 1 clove minced garlic
  • 1/4 tsp ground cayenne pepper
  • 1 inch ginger root, peeled and chopped
  • 1 tbsp cornstarch
  • 1 cup scallions, chopped
  • Fresh cilantro to taste (I used about a cup of chopped leaves)
  • 2 cups dry, roasted peanuts
  • Dried wonton noodles (optional)

Two hints: For the ginger, use a knife to peel it instead of a veggie peeler. When you’re done with the ginger piece, put the rest in the freezer to preserve its freshness for longer. For shelling the peanuts, I tried Alton Brown’s salad spinner method (see my Homemade Peanut Butter recipe) and it worked really well! It definitely saves time and angst.

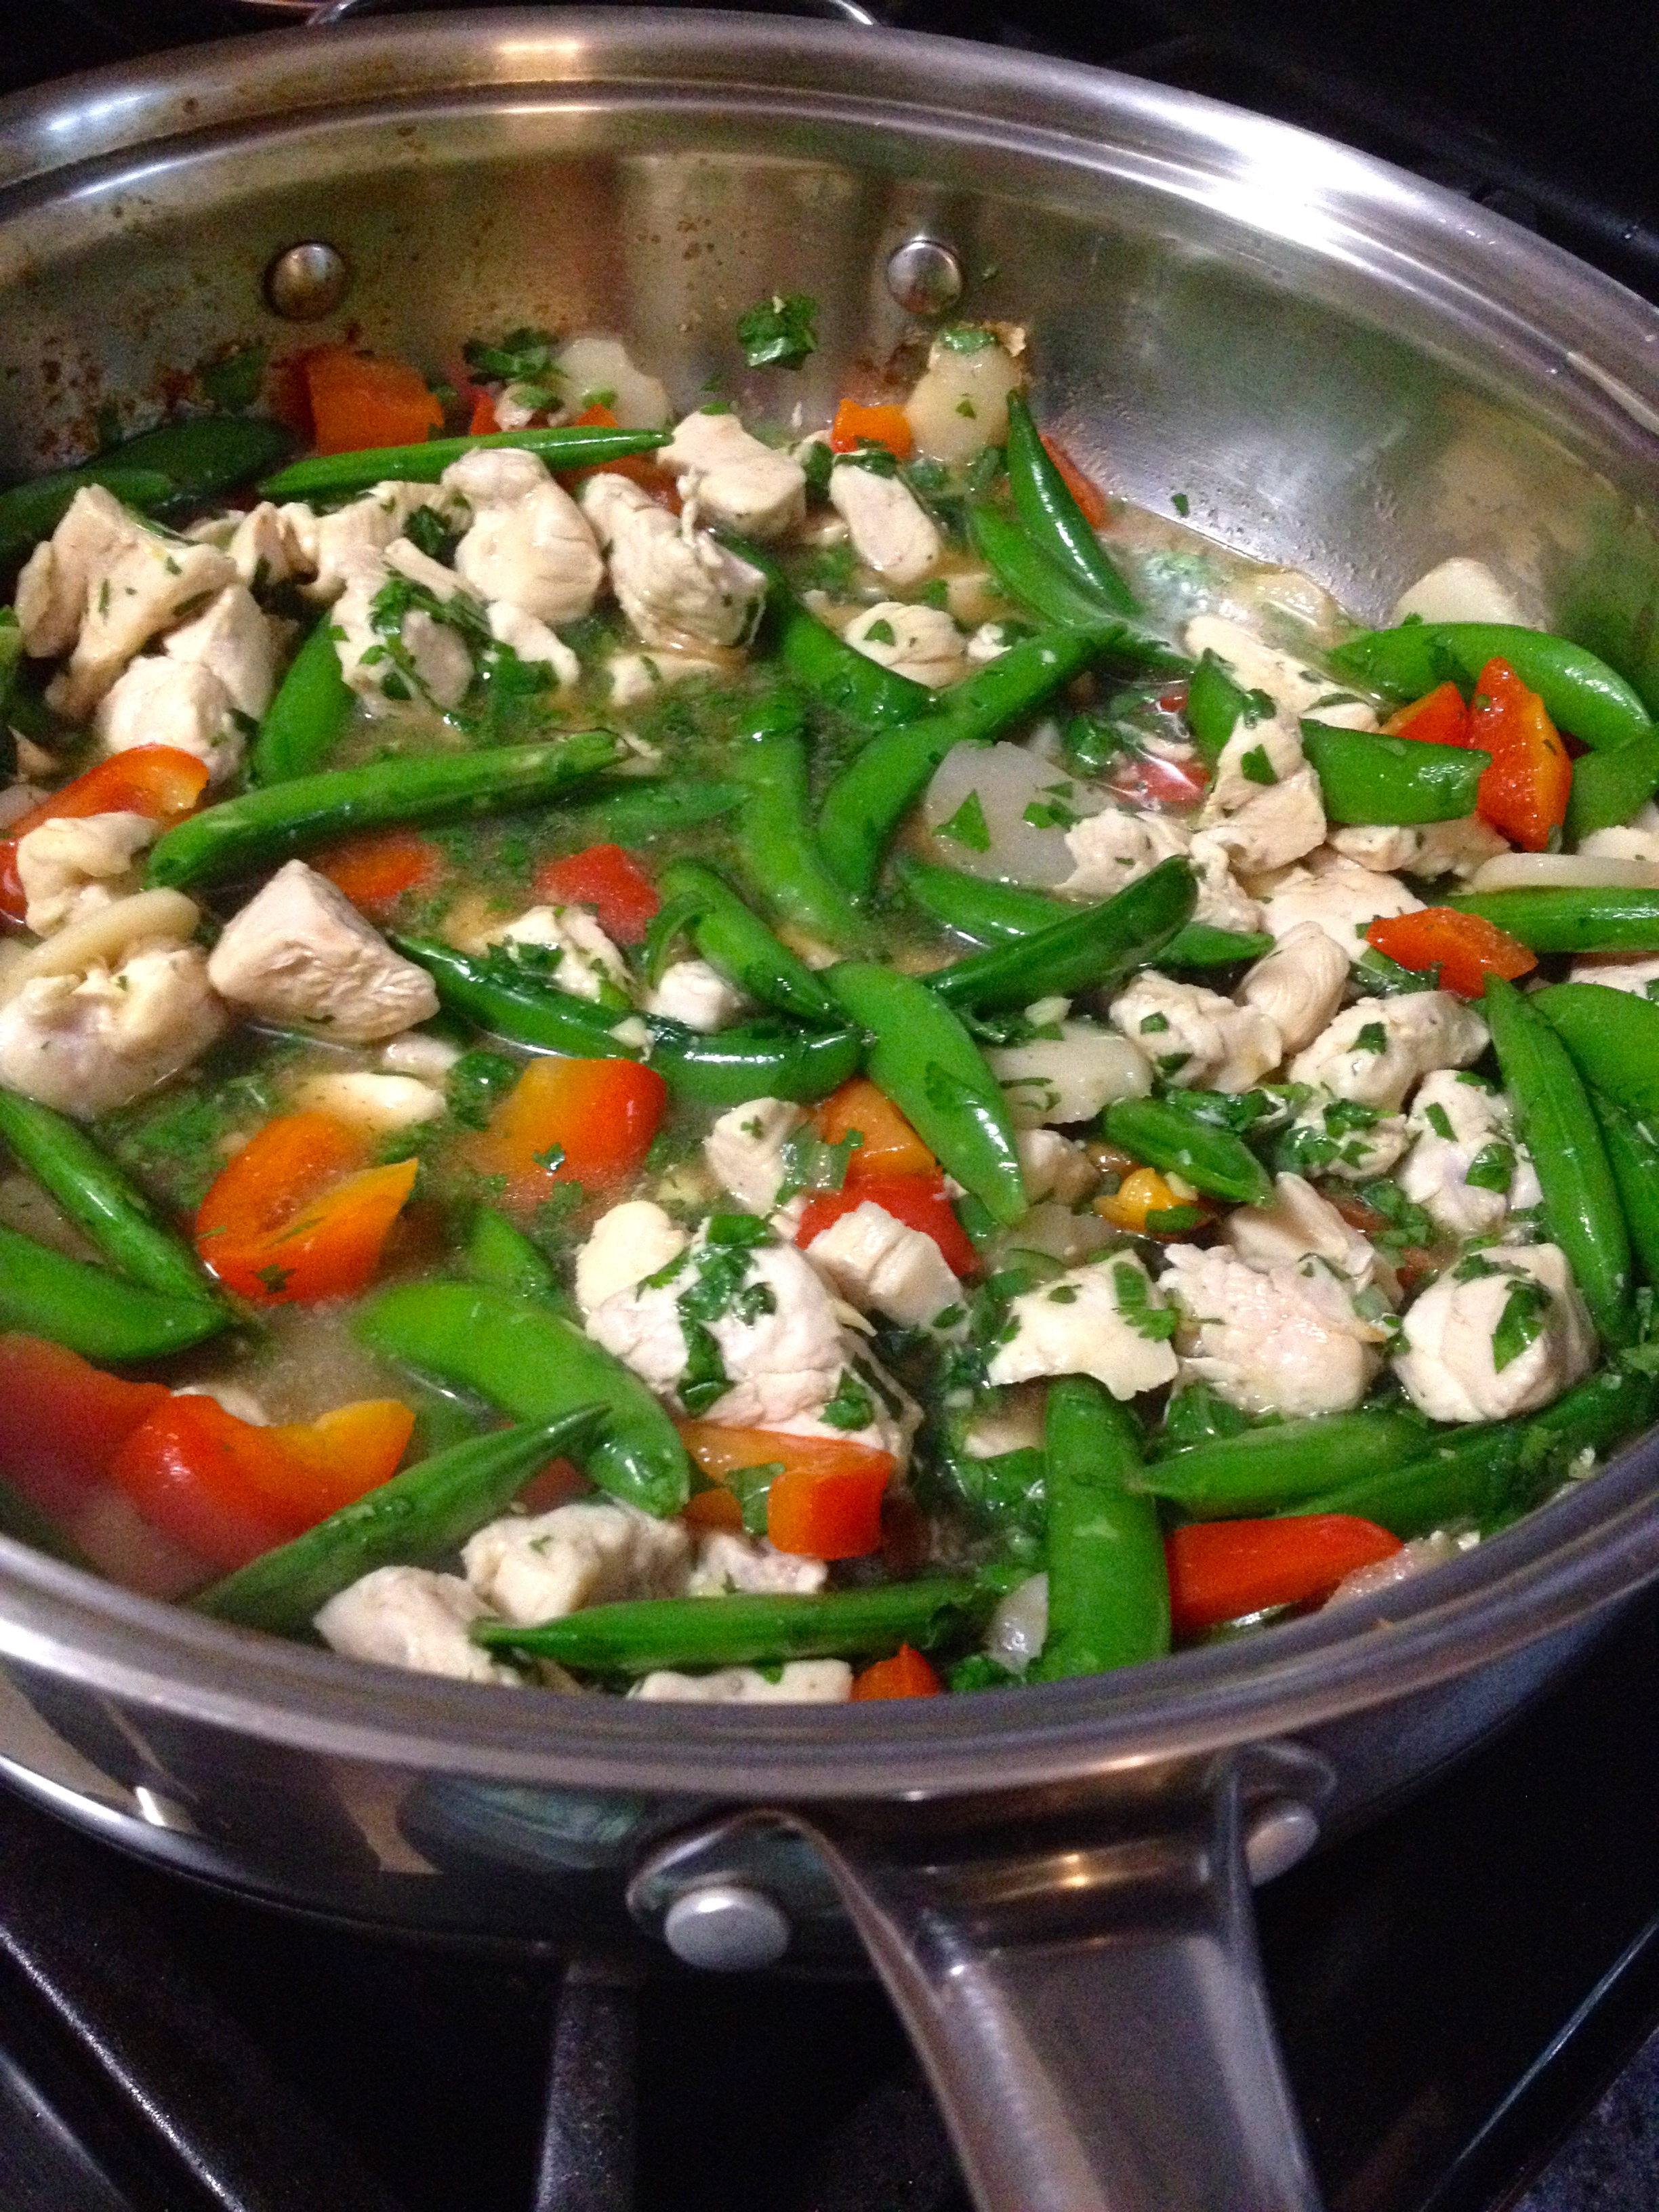
Start by cooking the chicken in a large skillet in the vegetable oil. It’s best if your skillet has high sides to prevent splashing, but if you don’t have one that’s fine! Also add the peas and the bell pepper to the chicken, and let them soften. While the chicken is cooking, mix up the broth, soy sauce, ginger, garlic, sugar, cayenne, and cornstarch. This will be the sauce for the chicken.

IMG_1155IMG_1154


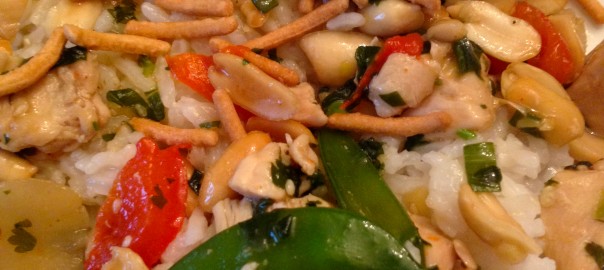
When the chicken is done cooking, pour the sauce over it. Also put the water chestnuts and most of the scallions and cilantro in the skillet, saving some for a garnish. Let the sauce reduce over high heat for about 5 minutes, or longer depending on how thick you want the sauce to be.

IMG_1155


When the sauce has thickened slightly, add the peanuts in and mix until the peanuts are coated. Then, serve over white jasmine rice and garnish with the remaining cilantro, scallions, and dried noodles!

IMG_1157IMG_1158


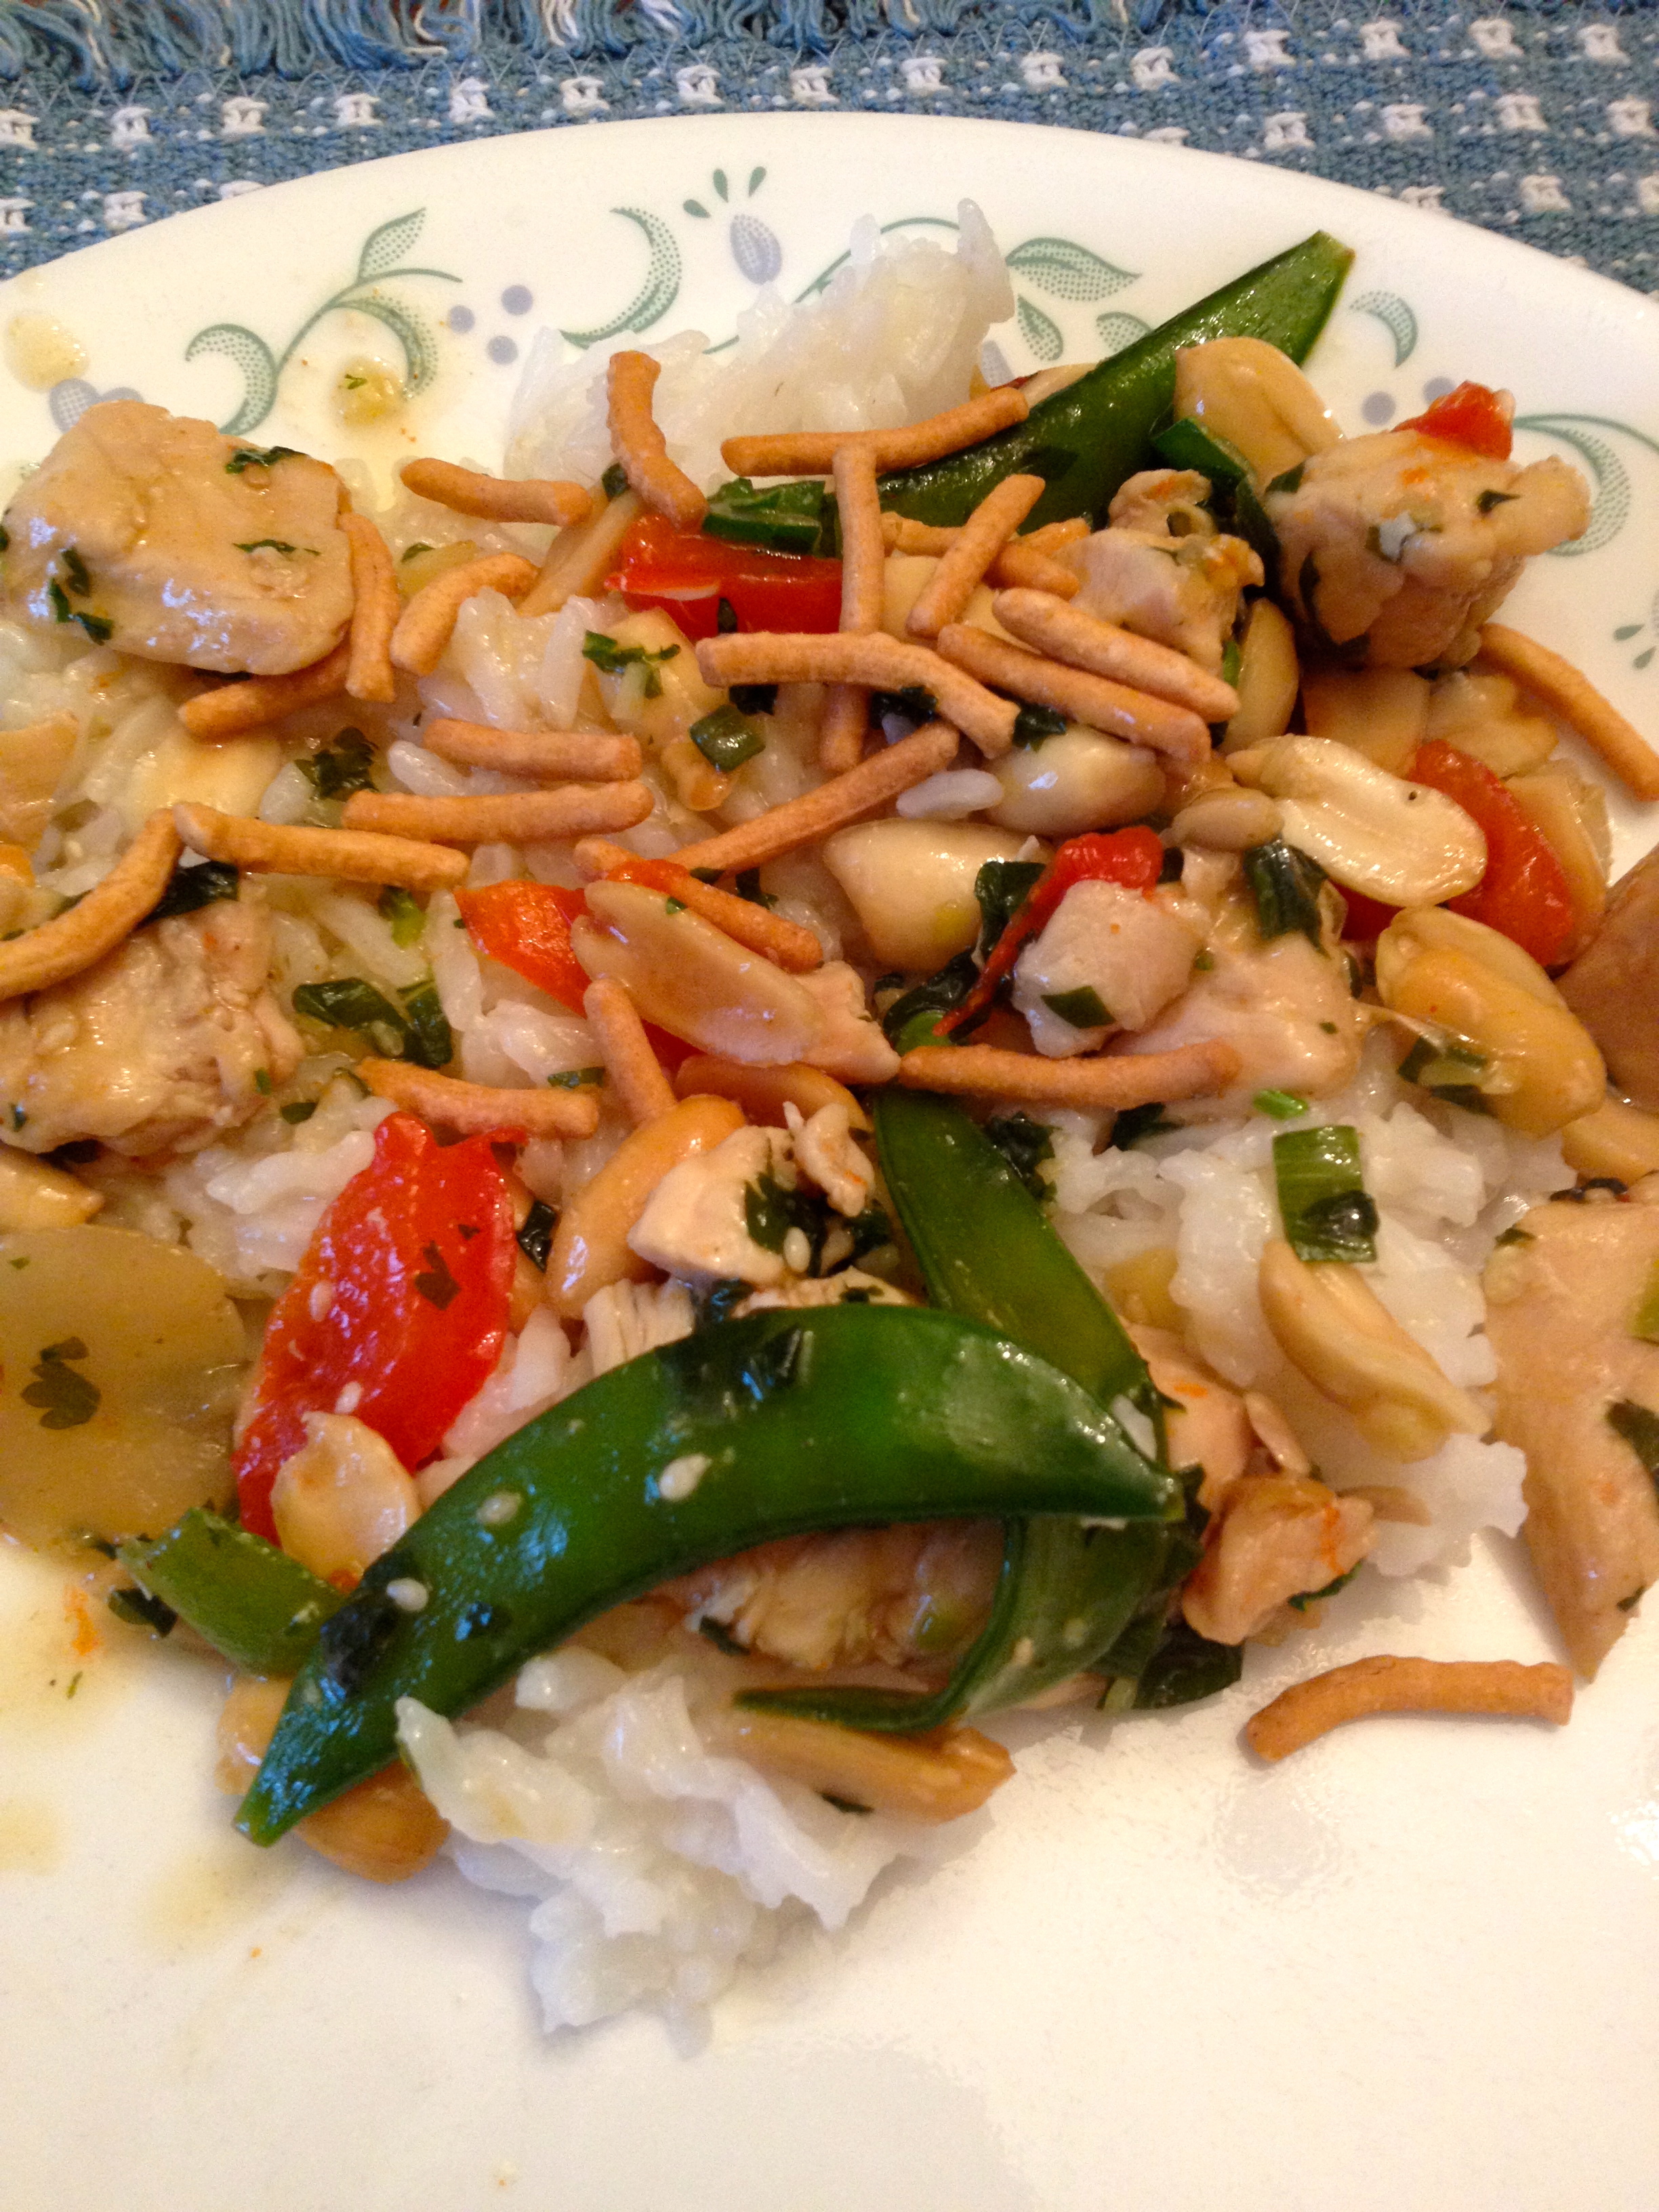
This recipe was just a whim because I had left over peanuts from making my homemade peanut butter, but it turned out to be a solid recipe for my collection. It’s a very light, tasty dish that’s full of vegetables and protein, and also full of flavor. The savory chicken broth and soy sauce glaze has incredible depth of flavor, and the vegetables and peanuts add a satisfying crunch and earthiness to the dish. And of course, who can resist the dried wonton noodles- they’re as addictive as potato chips! Happy cooking!

Oreo Balls… in Cookies!

Hi friends! I’m back at the baking, and decided to create a new cookie! For those of you who have eaten Oreo balls before, it’s a spin off of that. For those who haven’t experienced the Oreo ball delights, imagine this: soft Oreo filling, stuffed in a chocolate cookie with white chocolate chips in just the right places!

Is your mouth watering yet? Here’s the recipe! 

Ingredients:

Oreo Filling

  • 1 package Reduced Fat Oreo’s
  • 8 oz. reduced fat cream cheese, softened to room temperature

You can use regular Oreo’s or cream cheese, but I was trying to keep the calorie and fat count down. Plus, the less fat there is in the filling, the less likely it is to melt in the oven! 

Chocolate Cookie

  • 2 cups flour
  • 2/3 cup cocoa powder (unsweetened)
  • 1 tsp baking soda
  • 1/2 tsp salt
  • 1 cup margarine
  • 2/3 cup granulated sugar
  • 2/3 cup brown sugar
  • 1 tsp vanilla extract
  • 2 eggs
  • 1 package white chocolate chips (optional, but definitely recommended)

First, make the Oreo filling. It’s super easy! Just crush up the whole package of Oreo’s in a plastic bag, and pour them into a mixing bowl. Then, put the cream cheese in the bowl with the crushed Oreo’s. Using a hand mixer, combine the cream cheese and Oreo’s until it’s dark brown and thoroughly mixed. Set it aside. Here’s what it should look like: IMG_1133


Now it’s time for the cookie dough! Start by softening the margarine. When it’s softened, add the brown sugar and the granulated sugar, and mix until the butter is creamed and fully combined with the sugar. Add the eggs and mix. Add the vanilla extract and stir to combine. Then add the flour, baking soda, cocoa, and salt and mix well until everything is completely mixed. Before adding the white chocolate, this is what it should look like.

IMG_1134


Fold in the white chocolate chips. If you feel like doing a quality check, feel free to take a spoonful of the dough and taste it! I definitely did!

Now comes the exciting part: assembling the stuffed cookies! There were three different methods I tested, and all had completely different results. I’ll list them here according to the result, and you can decide which one you’d rather use.

Mounded, Thick Cookies with Chunks of Oreo

To get these types of cookies, take a spoonful of dough and lay it on a baking sheet. Then, using the bottom of a drinking glass dipped in granulated sugar, press the cookie flat. Put a 1/4 tsp of Oreo filling in the middle of the dough patty, and then pile more dough on top of the Oreo filling. Gently fold the edges of the bottom patty up so that the Oreo filling is enclosed. The process is depicted below:

IMG_1137

IMG_1136


IMG_1138

IMG_1140

Very Flat, Soft Cookies with Oreo Throughout

This process is almost like making stuffed sugar cookies, and it’s really simple! It’s easier than the first method, in my opinion, but you can choose what you wish! First, take a spoonful of cookie dough and roll it in a bowl of granulated sugar. Then, press it flat in your palms. Take a 1/4 tsp of Oreo filling and put it in the middle of the patty. Then, fold the dough around the Oreo filling and roll it into a ball again. Place it on the baking sheet, and with a sugared drinking glass, press it flat.

IMG_1141IMG_1142IMG_1143IMG_1144IMG_1145IMG_1147IMG_1150IMG_1137


Thick, Soft Cookies with Oreo Throughout

These were my personal favorites, and also won the prize among my test subjects! This is the easiest method, and in my opinion yields the best cookie. Do the same method as listed above, but don’t press it flat with a glass; just leave it in a ball on the baking sheet. This is how they looked:

IMG_1149

After you’ve chosen your favorite method, put the cookies in a 325ºF oven for 12 minutes (after 6 minutes, switch the baking sheets to the other rack in the oven). Make sure to enjoy some right after they come out of the oven- they’re soooo yummy warm!

Since I couldn’t eat all of these myself, I made up little plates of them and gave them away. I had extra Oreo filling left over, so I made regular Oreo balls! That’s another super easy recipe: just take a scoop of Oreo ball filling, and roll it in melted white chocolate and drizzle milk chocolate on top.

IMG_1166


These cookies were so yummy, my friends couldn’t stop eating them! They also made a great little gift in the small plates. If you’re in the mood for chocolate, go ahead and try this recipe! You won’t be disappointed!